Renovation Notes
What Should I Do If My Drywall Is Water-damaged?
If you’ve ever experienced water damage in your home, you know how stressful and overwhelming it can be. One area that is particularly susceptible to water damage is drywall. So, what should you do if your drywall is water-damaged? Don’t worry, I’ve got you covered! In this article, we’ll explore some practical steps you can take to address this issue and restore your drywall to its former glory.
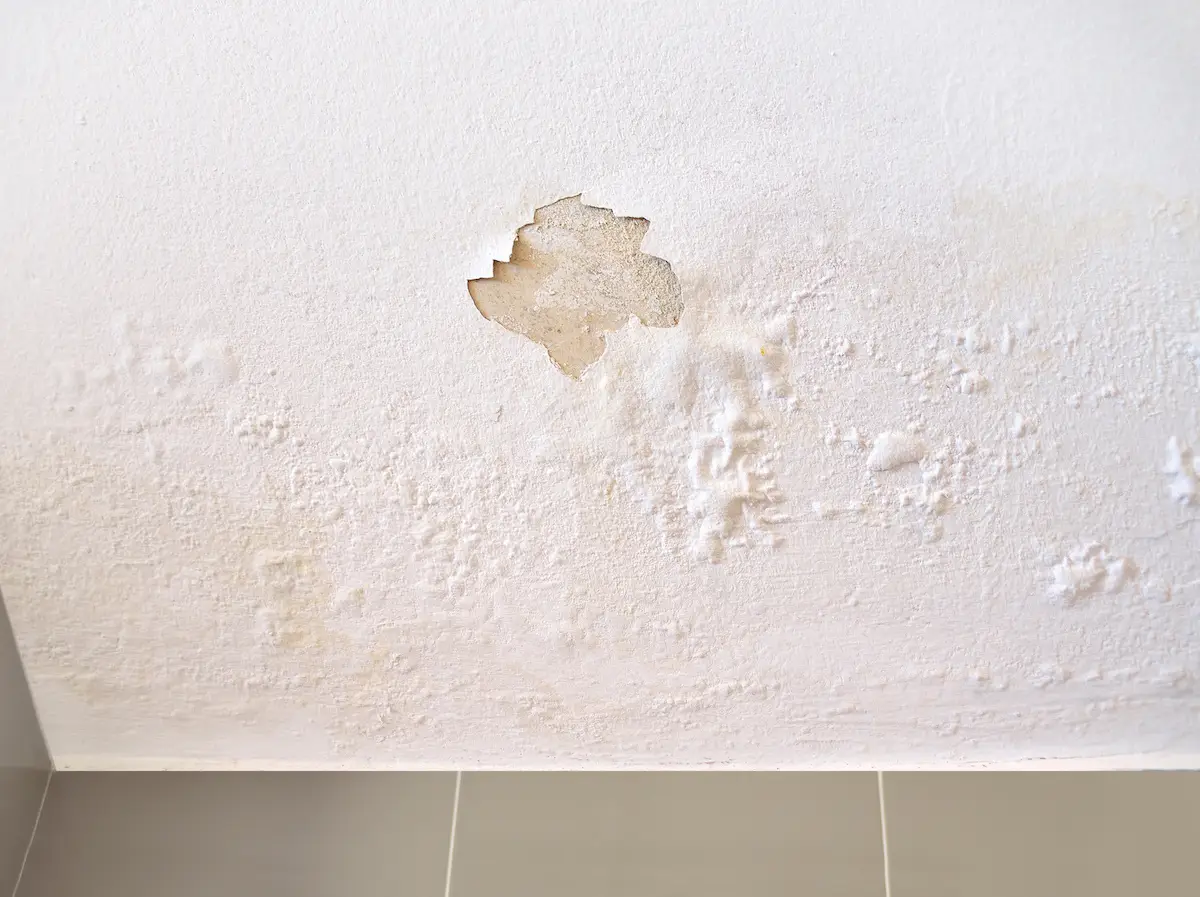
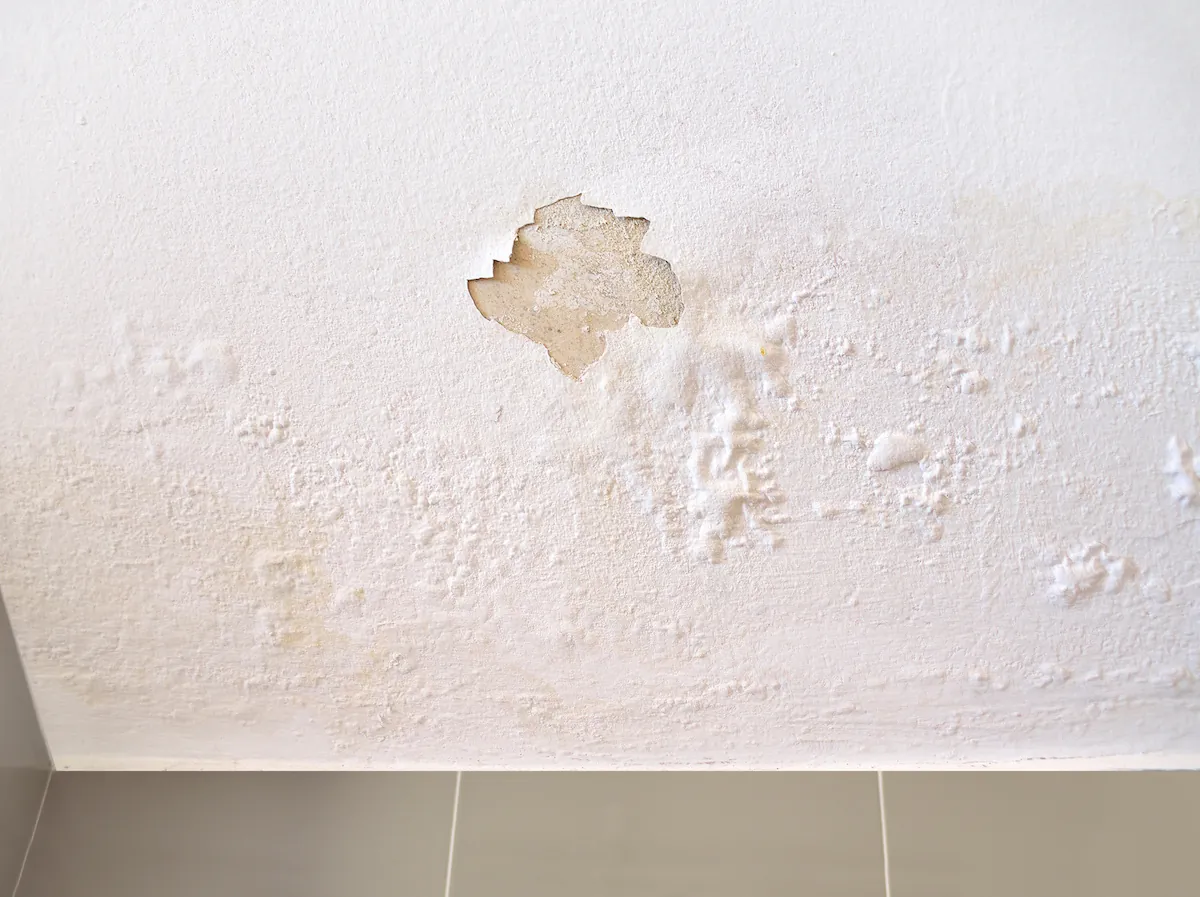
Water damage to drywall can occur for various reasons, such as leaks, floods, or plumbing issues. It’s important to address the problem promptly to prevent further damage and potential mold growth. But before we dive into the solutions, let’s first understand how to identify water damage in drywall. Keep reading to discover the signs to look out for and the steps you can take to mitigate the damage.
If your drywall has been water-damaged, it’s important to take immediate action to prevent further issues. Here are the steps you should follow:
- Identify the source of the water damage and fix it to prevent ongoing moisture.
- Remove any wet or damaged drywall, cutting it out in a clean line.
- Allow the area to dry completely. Use fans or dehumidifiers to speed up the process.
- Inspect for mold growth and treat with a mold-killing solution if necessary.
- Replace the damaged drywall with new material, ensuring a proper fit and secure installation.
- Finish the repaired area with joint compound, sanding, and painting to match the surrounding wall.
Following these steps will help restore your drywall and prevent further issues. Remember to prioritize safety and consult a professional if needed.
What Should I Do If My Drywall Is Water-Damaged?
Water damage to drywall can be a frustrating and stressful situation to deal with. Whether it’s caused by a leaky pipe, a roof leak, or flooding, it’s important to take immediate action to prevent further damage and ensure the safety of your home. In this article, we will discuss the steps you should take if your drywall is water-damaged, as well as provide some tips on how to prevent future water damage.
Assess the Damage
The first step in dealing with water-damaged drywall is to assess the extent of the damage. Look for signs of water stains, discoloration, swelling, or sagging in the affected area. If the drywall is severely damaged or if there is mold growth, it may need to be replaced entirely. However, if the damage is minimal and limited to a small area, you may be able to repair it yourself.
If the water damage is extensive or if you’re unsure of how to proceed, it’s best to consult with a professional. They will be able to assess the damage and provide guidance on the best course of action. Additionally, they can help identify and address any underlying issues that may have caused the water damage in the first place.
Remove the Wet Drywall
Once you’ve assessed the damage and determined that the affected drywall needs to be removed, it’s time to get to work. Start by turning off the power to the affected area to ensure your safety. Use a utility knife to cut away any wet or damaged drywall, making sure to cut along the edges of the studs.
After removing the wet drywall, inspect the area behind it for any signs of mold or further damage. If you discover mold growth, it’s important to address it immediately to prevent it from spreading. Consider using a mold remediation professional to ensure the proper removal and treatment of the mold.
Dry and Clean the Area
Once the damaged drywall has been removed, it’s crucial to thoroughly dry and clean the area before proceeding with any repairs. Use fans, dehumidifiers, and open windows to promote air circulation and aid in the drying process. Additionally, use a wet-dry vacuum to remove any standing water or excess moisture.
After the area has dried, clean it thoroughly with a mild detergent and water solution to remove any dirt, debris, or mold spores. Be sure to wear protective gear, such as gloves and a mask, to prevent any potential health hazards. Allow the area to dry completely before moving on to the next step.
Repair or Replace the Drywall
After the area has been thoroughly cleaned and dried, it’s time to repair or replace the damaged drywall. If the damage is minimal and limited to a small area, you may be able to repair it yourself using drywall compound and a putty knife. Apply a thin layer of compound to the damaged area, feathering the edges to create a smooth surface. Allow the compound to dry, and then sand it down until it’s flush with the surrounding drywall.
If the damage is more extensive or if you’re unsure of your repair abilities, it’s best to consult with a professional. They will be able to assess the situation and provide guidance on the best course of action. In some cases, it may be necessary to replace the entire section of drywall to ensure a proper and long-lasting repair.
Preventing Future Water Damage
While dealing with water-damaged drywall is undoubtedly a hassle, taking steps to prevent future water damage can save you time, money, and stress in the long run. Here are some tips to help protect your drywall from water damage:
– Regularly inspect your home for any signs of leaks or water damage, such as water stains or discoloration on walls or ceilings.
– Maintain your plumbing system by fixing any leaks or drips promptly and ensuring proper drainage.
– Keep gutters and downspouts clear of debris to prevent water from overflowing and seeping into your home.
– Install a sump pump in your basement or crawl space to help prevent flooding.
– Use moisture-resistant drywall or paint in areas prone to high humidity, such as bathrooms and kitchens.
By being proactive and taking these preventive measures, you can minimize the risk of water damage to your drywall and maintain the integrity of your home.
Conclusion
Dealing with water-damaged drywall can be a challenging and time-consuming task. However, by following the proper steps and taking preventive measures, you can effectively address the issue and minimize the risk of future damage. Remember to assess the extent of the damage, remove and dry the affected area, and repair or replace the damaged drywall as needed. Additionally, take steps to prevent future water damage by regularly inspecting your home, maintaining your plumbing system, and using moisture-resistant materials where appropriate. With these precautions in place, you can keep your drywall in good condition and ensure the long-term safety and stability of your home.
Key Takeaways
- If your drywall is water-damaged, it’s important to act quickly to prevent further damage and mold growth.
- Start by identifying the source of the water and fixing any leaks or plumbing issues.
- Remove any wet or damaged drywall to allow for proper drying and prevent mold.
- Use fans, dehumidifiers, and open windows to promote air circulation and speed up the drying process.
- Once the drywall is completely dry, repair or replace it as needed to restore the integrity of your wall.
Frequently Asked Questions
Q: How can I tell if my drywall is water-damaged?
Water damage to drywall can often go unnoticed until it becomes a bigger problem. However, there are a few signs you can look out for to determine if your drywall is water-damaged. First, check for any discoloration on the surface of the drywall. Water stains may appear as yellowish or brownish patches. Additionally, if the drywall feels soft or spongy to the touch, it is likely water-damaged. Peeling or bubbling paint, mold growth, or a musty odor in the area can also be indicators of water damage to the drywall.
If you suspect water damage, it is important to address it promptly to prevent further issues such as mold growth or structural damage. It may be necessary to consult a professional to assess the extent of the damage and determine the appropriate course of action.
Q: Can I repair water-damaged drywall myself?
While minor water damage to drywall can sometimes be repaired by homeowners, it is often best to seek professional help for more significant damage. If the water damage is extensive or if mold is present, it is recommended to hire a professional contractor who specializes in water damage restoration. They have the expertise and equipment to properly assess the damage, remove any mold or affected materials, and restore your drywall to its pre-damaged condition.
Attempting to repair water-damaged drywall on your own without the necessary knowledge and experience can result in inadequate repairs and potential health hazards. It is always better to be safe than sorry when it comes to water damage, so consulting a professional is highly recommended.
Q: How can I prevent water damage to my drywall?
Preventing water damage to your drywall is crucial in maintaining the integrity of your walls and preventing costly repairs. Here are some tips to help prevent water damage:
-
Address any plumbing leaks promptly: Leaking pipes or faucets can cause water to seep into your walls and damage the drywall. Fix any leaks as soon as you notice them.
-
Ensure proper drainage: Make sure your gutters and downspouts are clear of debris and functioning properly. This will help prevent water from overflowing and seeping into your walls.
-
Use water-resistant materials: In areas prone to moisture, such as bathrooms or basements, consider using moisture-resistant drywall or installing a waterproofing system.
-
Maintain proper ventilation: Good ventilation in areas with high humidity, such as bathrooms and kitchens, can help prevent excess moisture buildup and reduce the risk of water damage.
Q: How long does it take for drywall to dry after water damage?
The drying time for water-damaged drywall can vary depending on several factors, including the extent of the damage, the amount of water present, and the environmental conditions. In general, it can take anywhere from a few days to a couple of weeks for drywall to fully dry after water damage.
To expedite the drying process, it is important to remove any standing water and properly ventilate the area. Using fans, dehumidifiers, and opening windows can help promote air circulation and speed up drying. It is crucial to ensure that the drywall is completely dry before attempting any repairs or restoration to prevent mold growth or further damage.
Q: Can mold grow on water-damaged drywall?
Yes, mold can grow on water-damaged drywall if the conditions are favorable. Mold thrives in moist environments, and water-damaged drywall provides an ideal breeding ground. If water damage is not addressed promptly and the drywall remains damp, mold spores can begin to grow and spread.
Mold growth on drywall can not only cause unsightly stains but also pose health risks. Exposure to mold can lead to respiratory issues, allergies, and other health problems. Therefore, it is crucial to address water damage promptly and thoroughly dry the affected drywall to prevent mold growth.
How to repair water damaged drywall in one day!!
Final Summary: What to Do If Your Drywall Is Water-Damaged?
So, you’ve discovered water damage on your drywall and you’re wondering what steps to take next. Dealing with water-damaged drywall can be a stressful situation, but fear not! With the right approach, you can address the issue effectively and restore your walls to their former glory.
First and foremost, it’s crucial to assess the extent of the damage. Inspect the affected area thoroughly to determine if the water has seeped into the structural components behind the drywall. If you notice signs of structural damage, such as warping or sagging, it’s advisable to consult a professional for further evaluation. However, if the damage is limited to the surface of the drywall, you can proceed with the following steps.
To begin the restoration process, start by removing any wet or damaged materials, such as wallpaper, paint, or insulation. This will help prevent mold growth and further deterioration. Next, thoroughly dry the area using fans, dehumidifiers, or heaters to eliminate excess moisture. Keep in mind that proper ventilation is essential during this stage to prevent the buildup of humidity.
Once the area is dry, you can proceed with repairing the damaged drywall. Begin by cutting out any sections that are beyond repair and replace them with new drywall. Use joint compound and mesh tape to seal the seams between the new and existing drywall. Remember to sand the area