Renovation Notes
How To Replace Spiral Window Balance?
Are you tired of struggling with a faulty spiral window balance? Well, fret no more because I’m here to guide you through the process of replacing it! In this article, we’ll explore the step-by-step instructions on how to replace a spiral window balance, ensuring that your windows operate smoothly and effortlessly. So, let’s dive in and learn how to tackle this task like a pro!
Replacing a spiral window balance might seem like a daunting task, but with the right guidance, it can be a breeze. Whether you’re a seasoned DIY enthusiast or just starting out, I’ve got you covered. We’ll walk through the process, from identifying the issue with your current balance to safely removing it and installing a new one. By the end of this article, you’ll have the knowledge and confidence to successfully replace your spiral window balance and enjoy the benefits of fully functional windows once again. So, let’s get started and bring back the smooth operation to your windows!
How to Replace Spiral Window Balance?
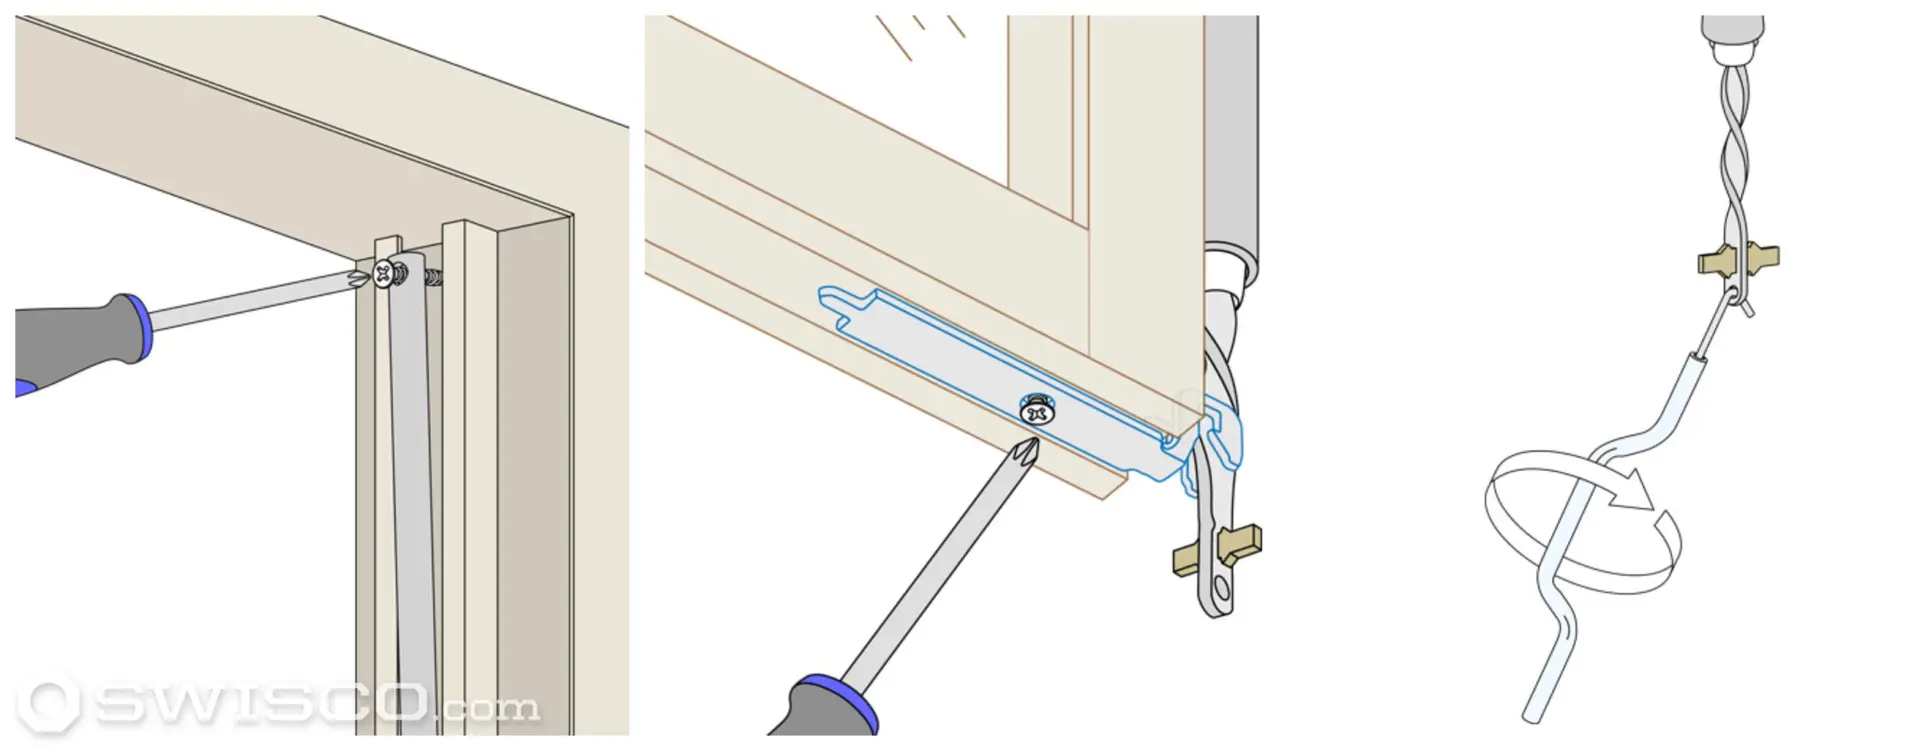
Step 1: Start by removing the sash from the window frame. Use a screwdriver to release any screws or clips holding it in place.
Step 2: Locate the spiral balance at the side of the window frame. Depending on the design, it may be visible or hidden behind a cover.
Step 3: Disconnect the spiral balance from the sash bracket by releasing the tension. This can usually be done by turning the balance counterclockwise.
Step 4: Install the new spiral balance by attaching it to the sash bracket and turning it clockwise to tighten the tension.
Step 5: Finally, reattach the sash to the window frame and test the balance by opening and closing the window.

How to Replace Spiral Window Balance?
Replacing the spiral window balance in your windows is an important maintenance task that ensures smooth and effortless operation. Over time, the spiral balance may wear out or become damaged, causing your windows to become difficult to open or close. However, with the right tools and a step-by-step approach, you can easily replace the spiral window balance and restore the functionality of your windows. In this article, we will guide you through the process of replacing the spiral window balance, providing you with valuable tips and insights along the way.
Understanding the Spiral Window Balance
The spiral window balance is a crucial component of double-hung windows. It consists of a spiral-shaped metal rod that is attached to a spring. This mechanism helps to counterbalance the weight of the window sash, allowing for smooth and controlled movement. Over time, the spiral balance may deteriorate due to normal wear and tear, or it may become damaged, affecting the overall performance of your windows. By replacing the spiral window balance, you can ensure that your windows operate efficiently and effortlessly.
When it comes to replacing the spiral window balance, it’s important to have a basic understanding of the different components involved. The balance itself consists of three main parts: the spiral rod, the pivot shoe, and the pivot bar. The spiral rod is the long metal rod that extends vertically along the side of the window frame. The pivot shoe is a small plastic or metal component that attaches to the bottom of the window sash and holds the spiral rod in place. The pivot bar, on the other hand, is a metal bar that connects the pivot shoe to the sash. These components work together to provide the necessary counterbalance for the window sash.
Gathering the Necessary Tools and Materials
Before you begin the process of replacing the spiral window balance, it’s important to gather all the necessary tools and materials. This will ensure that you have everything you need to complete the task efficiently. Here are the tools and materials you will need:
-
Screwdriver: A screwdriver is essential for removing screws and other fasteners.
-
Pliers: Pliers will come in handy for gripping and manipulating small components.
-
Replacement Spiral Window Balance: It’s important to have a replacement spiral window balance that matches the specifications of your existing balance.
-
Lubricant: A lubricant such as silicone spray or white lithium grease will help to ensure smooth operation of the new spiral window balance.
-
Safety Glasses: Safety glasses are essential for protecting your eyes from any potential debris or accidents during the replacement process.
Once you have gathered all the necessary tools and materials, you are ready to move on to the next steps of the process. Remember to always prioritize safety and take necessary precautions throughout the replacement process.
Step-by-Step Guide to Replacing the Spiral Window Balance
Replacing the spiral window balance involves several steps that need to be followed carefully. By following this step-by-step guide, you can ensure a successful replacement process. Let’s dive into the details:
Step 1: Remove the Window Sash
The first step in replacing the spiral window balance is to remove the window sash. Start by opening the window as wide as possible. Locate the screws or fasteners that secure the sash to the frame and remove them using a screwdriver. Once the screws are removed, carefully lift the sash out of the frame and set it aside in a safe place.
Step 2: Remove the Old Spiral Window Balance
With the window sash removed, you can now focus on removing the old spiral window balance. Take a close look at the balance and locate the pivot shoe at the bottom of the sash. Use pliers to grip the pivot shoe and pull it downward, disengaging it from the sash. Once the pivot shoe is detached, you can easily slide the old spiral window balance out of the pivot shoe and remove it from the window frame.
Step 3: Install the New Spiral Window Balance
Now that the old spiral window balance is removed, it’s time to install the new one. Start by inserting the new spiral rod into the pivot shoe, making sure it fits securely. Slide the pivot shoe back into the bottom of the window sash and make sure it is properly aligned. Next, attach the pivot bar to the pivot shoe, ensuring a tight and secure connection. Finally, extend the spiral rod all the way to the top of the window frame and attach it securely.
Step 4: Test the Window Operation
Once the new spiral window balance is installed, it’s important to test the window operation to ensure everything is working properly. Carefully lift the window sash and check if it moves smoothly and effortlessly. If there are any issues or resistance, make sure to double-check the installation and make any necessary adjustments.
Step 5: Lubricate the Spiral Window Balance
To ensure smooth and long-lasting operation, it’s recommended to lubricate the new spiral window balance. Apply a small amount of lubricant, such as silicone spray or white lithium grease, to the spiral rod and pivot points. This will help reduce friction and ensure smooth movement of the window sash.
Step 6: Reinstall the Window Sash
With the new spiral window balance and lubrication in place, it’s time to reinstall the window sash. Carefully lift the sash back into the window frame, aligning it with the designated grooves or tracks. Once the sash is properly aligned, secure it in place using the screws or fasteners that were previously removed.
Step 7: Test the Window Operation Again
After reinstalling the window sash, it’s important to test the window operation one final time. Open and close the window several times to ensure smooth and effortless movement. If everything is working properly, congratulations! You have successfully replaced the spiral window balance.
In summary, replacing the spiral window balance is a relatively straightforward process that can greatly improve the functionality of your windows. By following the step-by-step guide outlined in this article, you can confidently replace the spiral window balance and enjoy smooth and effortless window operation. Remember to always prioritize safety and take necessary precautions throughout the replacement process. Happy window maintenance!
Key Takeaways: How to Replace Spiral Window Balance?
- Replacing a spiral window balance involves removing the window sash and detaching the old balance.
- Measure the length of the old balance and purchase a replacement spiral balance of the same length.
- Install the new spiral balance by attaching it to the window sash and securing it in place.
- Test the window to ensure it operates smoothly and adjust the tension if needed.
- Regular maintenance and inspection can help prevent the need for frequent replacements.
Frequently Asked Questions
1. What tools do I need to replace a spiral window balance?
To replace a spiral window balance, you will need a few tools. First, you’ll need a screwdriver to remove the screws holding the balance in place. You may also need a pair of pliers to help with removing any clips or brackets. Additionally, having a putty knife or scraper can be helpful for removing any old adhesive or caulking. Finally, it’s a good idea to have a tape measure to ensure the new balance is the correct length.
Remember to always wear safety glasses and gloves when working with windows, as broken glass or sharp edges can pose a risk of injury.
2. How do I remove the old spiral window balance?
To remove the old spiral window balance, start by opening the window fully. Locate the balance on the side of the window frame and look for any screws or clips holding it in place. Use a screwdriver to remove these screws and gently pull the balance away from the window frame. If there are any clips or brackets holding the balance, use pliers to release them. Once the balance is free, carefully remove it from the window.
Be careful when removing the old balance, as it may be brittle or damaged. Take your time and handle it with care to avoid any accidents.
3. How do I measure for a new spiral window balance?
Measuring for a new spiral window balance is important to ensure you get the correct replacement. Start by fully opening the window and measuring the visible glass height. This is the distance from the top to the bottom of the glass. Next, measure the width of the window frame. Finally, measure the diameter of the spiral balance tube.
When ordering a new spiral window balance, provide these measurements to the manufacturer or supplier to ensure you receive the correct size and type of balance for your window.
4. How do I install a new spiral window balance?
To install a new spiral window balance, start by preparing the window frame. Remove any old adhesive or caulking from the area where the balance will be installed. Next, insert the new balance into the window frame, making sure it is aligned properly. Use a screwdriver to secure any screws or clips that hold the balance in place. Finally, test the window to ensure it opens and closes smoothly with the new balance.
If you are unsure about the installation process, it’s always best to consult the manufacturer’s instructions or seek professional assistance.
5. Can I replace a spiral window balance myself, or should I hire a professional?
Replacing a spiral window balance can be done by a homeowner with basic DIY skills. However, if you are not comfortable working with windows or do not have the necessary tools, it may be best to hire a professional. Window balances play an important role in the functionality of the window, so it’s crucial to ensure they are installed correctly.
If you decide to hire a professional, make sure to research and choose a reputable window repair or installation company to ensure the job is done properly.
Conclusion: A Breath of Fresh Air for Your Windows
And there you have it! Replacing spiral window balances doesn’t have to be a daunting task. With a few simple steps and the right tools, you can breathe new life into your windows and enjoy smooth and effortless operation once again. Remember, safety should always come first, so make sure to take the necessary precautions before starting the replacement process.
Now that you know the ins and outs of replacing spiral window balances, you can confidently tackle this project and save yourself the hassle and expense of hiring a professional. Whether you’re a seasoned DIY enthusiast or a beginner, this guide has equipped you with the knowledge to get the job done right. So grab your tools, roll up your sleeves, and let’s bring fresh air and natural light back into your home!
Remember, maintaining your windows is crucial to their longevity and performance. Regular inspections and maintenance will help prevent issues and ensure your windows continue to function properly. So don’t neglect your windows – give them the care they deserve, and they’ll reward you with years of beauty and functionality.