Renovation Notes
How To Replace A Window Pane In A Wooden Door?
If you find yourself staring at a cracked or broken window pane in your wooden door, don’t panic! I’m here to help you learn how to replace it like a pro. Whether it’s due to an accident, wear and tear, or simply wanting to upgrade your door’s appearance, replacing a window pane in a wooden door is a task that can be easily accomplished with the right guidance. So, grab your tools and let’s get started!
When it comes to replacing a window pane in a wooden door, you might think it’s a daunting task, but fear not! With a few simple steps and some handy tips, you’ll have that window looking brand new in no time. In this article, I’ll walk you through the process, from removing the old pane to installing the new one. You’ll be amazed at how quickly you can transform the look of your door and enhance its functionality. So, let’s dive in and learn how to replace a window pane in a wooden door together!
How to Replace a Window Pane in a Wooden Door?
Replacing a window pane in a wooden door is a simple process that you can do yourself with a few tools. Here’s a step-by-step tutorial to help you out:
- Remove the broken glass by carefully prying it out of the door frame.
- Measure the dimensions of the opening and purchase a replacement glass pane.
- Apply a thin layer of glazing compound around the edges of the opening.
- Insert the new glass pane into the opening and press it firmly into the glazing compound.
- Secure the glass pane in place with glazing points.
- Apply another layer of glazing compound over the points to seal them.
- Allow the compound to dry completely before painting or finishing the door.
Replacing a window pane in a wooden door is a quick and easy DIY project that can save you money on hiring a professional. Remember to wear gloves and safety glasses when working with glass.

How to Replace a Window Pane in a Wooden Door?
Replacing a window pane in a wooden door may seem like a daunting task, but with the right tools and a step-by-step approach, it can be easily accomplished. Whether your window pane has cracked, shattered, or is simply outdated, replacing it can improve the appearance and functionality of your wooden door. In this article, we will guide you through the process of replacing a window pane in a wooden door, providing you with the necessary knowledge and confidence to complete the task successfully.
Step 1: Gather the Required Tools and Materials
Before you begin the process of replacing a window pane in a wooden door, it is essential to gather all the necessary tools and materials. Here’s a list of items you will need:
- Safety goggles and gloves: Protect your eyes and hands while handling glass and tools.
- Tape measure: Measure the dimensions of the existing window pane to ensure a proper fit.
- Putty knife: Use a putty knife to remove old glazing putty and paint from the wooden frame.
- Glazing compound: This material will hold the new window pane in place.
- Glass cutter: Use a glass cutter to score the glass along the desired dimensions.
- Glass suction cups: These will help you safely handle and position the new window pane.
- Hammer and nails: Use these to secure the glazing points that hold the glass in place.
- Sandpaper: Smooth out any rough edges on the wooden frame.
- Primer and paint: If necessary, apply a fresh coat of primer and paint to the wooden door.
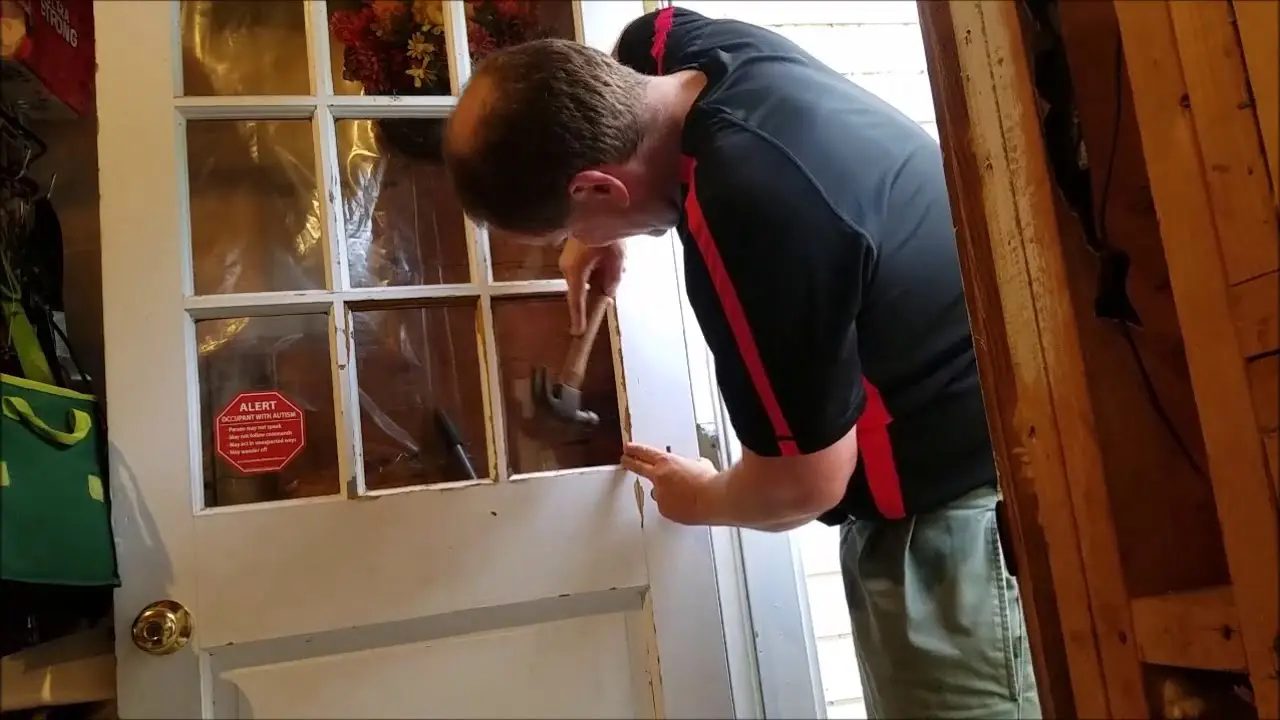
Step 2: Remove the Old Window Pane
To replace a window pane in a wooden door, you first need to remove the old one. Follow these steps:
- Put on your safety goggles and gloves to protect yourself from any potential injuries.
- Use a putty knife to carefully remove the old glazing putty and any existing paint from the wooden frame. Be gentle to avoid damaging the wood.
- Once the putty and paint are removed, you should see the glazing points that hold the glass in place. Use a pair of pliers or a putty knife to remove these points.
- Gently tap the glass from the inside to loosen it from the frame. Be cautious not to break the glass further.
- Once the glass is loose, carefully remove it from the wooden door and set it aside for proper disposal.
Step 3: Measure and Cut the New Window Pane
With the old window pane removed, it’s time to measure and cut the new one. Follow these guidelines:
- Measure the dimensions of the opening in the wooden frame. Use a tape measure to ensure accuracy.
- Transfer the measurements to the new piece of glass. Use a glass cutter to score along the marked lines.
- Place a wooden dowel or a ruler underneath the scored line and apply gentle pressure to snap the glass along the score line.
- Use sandpaper to smooth any rough edges on the newly cut glass.
Step 4: Install the New Window Pane
Now that you have the new window pane, it’s time to install it. Follow these steps:
- Apply a thin and even layer of glazing compound to the inside of the wooden frame. This will act as an adhesive to hold the glass in place.
- Carefully position the new window pane into the frame. Use glass suction cups to handle it safely.
- Press the glass firmly against the glazing compound to ensure a secure fit.
- Use a hammer and nails to secure glazing points along the edges of the glass. These points will hold the glass in place until the glazing compound dries.
- Allow the glazing compound to dry according to the manufacturer’s instructions.
- Once the glazing compound is dry, use a putty knife to apply a layer of fresh glazing putty around the edges of the glass. This will provide added protection and a finished look.
- If necessary, apply a fresh coat of primer and paint to the wooden door to match the surrounding area.
Replacing a window pane in a wooden door may require some time and effort, but the end result is worth it. By following these steps and taking the necessary precautions, you can successfully replace a window pane in a wooden door, enhancing both its appearance and functionality. Remember to always prioritize safety and take your time to ensure a job well done.
Key Takeaways: How to Replace a Window Pane in a Wooden Door?
- Measure the size of the window pane to ensure you purchase the correct replacement.
- Remove the broken glass carefully using gloves and protective eyewear.
- Apply a thin layer of glazing compound to the window frame before placing the new pane.
- Secure the pane with glazier’s points and apply more glazing compound to seal it in place.
- Allow the compound to dry thoroughly before painting or staining the door.
Frequently Asked Questions
Question 1: Can I replace a window pane in a wooden door by myself?
Yes, you can replace a window pane in a wooden door by yourself with the right tools and materials. However, this task requires some level of DIY skills and knowledge. If you are unsure or uncomfortable with the process, it is recommended to seek professional help.
To replace a window pane in a wooden door, you will need to remove the old pane, measure the dimensions of the replacement glass, prepare the new pane, and install it securely. It is also important to follow safety precautions and wear protective gear, such as gloves and goggles, during the process.
Question 2: What tools do I need to replace a window pane in a wooden door?
To replace a window pane in a wooden door, you will need the following tools:
– Safety gloves and goggles
– Putty knife
– Glazing compound
– Glass cutter or glass cutting service
– Screwdriver
– Hammer
– Chisel
– Measuring tape
– Sandpaper
– Paintbrush
– Paint or stain (if necessary)
– Caulk gun (optional)
Having these tools ready before you begin the replacement process will make the task easier and more efficient.
Question 3: How do I remove the old window pane from a wooden door?
To remove the old window pane from a wooden door, follow these steps:
-
Put on safety gloves and goggles for protection.
-
Use a putty knife to carefully remove any glazing compound around the edges of the window pane.
-
Gently tap the glass with a hammer to break it into smaller pieces.
-
Use a screwdriver or chisel to remove any remaining glass shards from the frame.
-
Clean the frame and remove any debris or old putty.
By following these steps, you can safely and effectively remove the old window pane from your wooden door.
Question 4: How do I measure the dimensions for a replacement window pane?
To measure the dimensions for a replacement window pane, follow these steps:
-
Use a measuring tape to measure the height and width of the opening in the door where the window pane will be installed.
-
Take accurate measurements from the inside edges of the frame.
-
Subtract a small amount, typically 1/8 inch, from both the height and width measurements to allow for proper fitting of the replacement pane.
-
Double-check your measurements to ensure accuracy before ordering or cutting the replacement glass.
By following these steps, you can ensure that your replacement window pane will fit perfectly into the wooden door.
Question 5: How do I install a replacement window pane in a wooden door?
To install a replacement window pane in a wooden door, follow these steps:
-
Apply a thin layer of glazing compound to the inside edges of the window frame.
-
Carefully place the replacement glass pane into the frame, ensuring that it fits snugly.
-
Press the glass gently into the glazing compound to secure it in place.
-
Use a putty knife to smooth out any excess glazing compound around the edges of the glass.
-
Allow the glazing compound to dry according to the manufacturer’s instructions.
By following these steps, you can successfully install a replacement window pane in your wooden door.
Final Summary: How to Replace a Window Pane in a Wooden Door?
And there you have it, a comprehensive guide on how to replace a window pane in a wooden door. It may seem like a daunting task at first, but with the right tools and a little bit of know-how, you can tackle this project with confidence. Remember to prioritize safety and take your time to ensure a job well done.
One important thing to keep in mind is that every door is different, so it’s essential to adapt these steps to the specific needs of your wooden door. Don’t be afraid to seek professional help if you’re uncertain or uncomfortable with any part of the process. It’s better to be safe than sorry.
By following these steps and incorporating the tips and tricks mentioned throughout the article, you’ll be able to replace a window pane in a wooden door like a pro. Not only will you save money by doing it yourself, but you’ll also have the satisfaction of completing a DIY project that enhances both the functionality and aesthetics of your door. So, roll up your sleeves, gather your tools, and get ready to tackle this window pane replacement with confidence!