Renovation Notes
How To Install Andersen Replacement Windows?

If you’re looking to give your home a fresh, new look, installing Andersen replacement windows can make a world of difference. Not only will they enhance the aesthetics of your space, but they’ll also improve energy efficiency and increase the value of your property. But how exactly do you go about installing these windows? In this article, we’ll walk you through the step-by-step process of how to install Andersen replacement windows, ensuring that you have all the information you need to complete the project successfully.
When it comes to installing Andersen replacement windows, it’s important to have a clear plan in mind. From measuring the opening to removing the old window and finally installing the new one, each step requires attention to detail and careful execution. In this comprehensive guide, we’ll break down the process into easy-to-follow steps, providing you with all the tips and tricks you need for a seamless installation. So, grab your tools, put on your DIY hat, and let’s get started on transforming your home with Andersen replacement windows!
How to Install Andersen Replacement Windows?
If you’re wondering how to install Andersen replacement windows, follow these step-by-step instructions:
- Start by measuring the existing window opening to ensure the replacement window will fit properly.
- Remove the old window by carefully prying away any trim or caulk.
- Position the new Andersen replacement window into the opening, making sure it is level and plumb.
- Secure the window in place by driving screws through the pre-drilled holes in the frame.
- Seal the edges of the window with caulk to prevent drafts and water leakage.
- Finally, install any necessary trim to complete the installation.
By following these steps, you’ll be able to successfully install Andersen replacement windows in your home.
How to Install Andersen Replacement Windows?
Are you looking to upgrade your home with new windows? Installing Andersen replacement windows is a great option that can enhance both the aesthetics and energy efficiency of your home. Whether you’re a seasoned DIY enthusiast or a beginner, this guide will walk you through the step-by-step process of installing Andersen replacement windows. With the right tools and a little patience, you can transform your home with beautiful and functional windows.
1. Gather the Necessary Tools and Materials
Before you begin the installation process, it’s essential to gather all the tools and materials you’ll need. Here’s a list of the items you should have on hand:
- Andersen replacement windows
- Measuring tape
- Screwdriver
- Level
- Hammer
- Utility knife
- Caulk gun
- Silicone caulk
- Screws
- Shims
- Insulation
Having these tools and materials ready will ensure a smooth and efficient installation process.
2. Measure and Prepare the Window Opening
Accurate measurements are crucial for a proper window installation. Start by measuring the width and height of the window opening. Take multiple measurements to ensure accuracy. Once you have the measurements, remove the existing window and clean the opening. Remove any debris, old caulk, or paint that may hinder the installation process.
Next, inspect the window sill for any damage or rot. If you notice any issues, it’s essential to repair them before proceeding with the installation. This will ensure a solid foundation for your new Andersen replacement window.
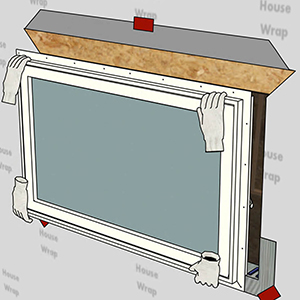
3. Install the New Window
With the window opening prepped, it’s time to install the new Andersen replacement window. Follow these steps:
- Apply a thin bead of silicone caulk along the inside of the window opening.
- Place the new window into the opening, ensuring it is level and centered.
- Insert shims between the window and the opening to provide support and ensure proper alignment.
- Check the window for level and adjust the shims as needed.
- Secure the window in place by driving screws through the pre-drilled holes in the window frame.
- Use a utility knife to trim the excess shim material.
- Apply insulation around the window frame to prevent drafts and improve energy efficiency.
- Seal the gaps between the window and the opening with silicone caulk.
Following these steps will result in a secure and properly installed Andersen replacement window.
4. Test and Adjust the Window
Once the window is installed, it’s crucial to test its functionality. Open and close the window multiple times to ensure smooth operation. Check for any gaps or drafts around the window and address them with additional insulation or caulk if necessary.
If you notice any issues with the window’s operation or fit, make the necessary adjustments. It’s important to address any problems before completing the installation process.
5. Finish the Installation
With the window properly installed and tested, it’s time to finish the installation process. Trim any excess caulk or insulation and clean the window and surrounding area. This will give your new Andersen replacement window a polished and professional look.
It’s important to follow any manufacturer-specific recommendations for maintenance and care. This will ensure the longevity and performance of your Andersen replacement windows.
Benefits of Installing Andersen Replacement Windows
There are several benefits to installing Andersen replacement windows in your home:
- Improved energy efficiency: Andersen replacement windows are designed to be highly energy-efficient, helping to reduce heating and cooling costs.
- Enhanced aesthetics: These windows come in a variety of styles and finishes, allowing you to choose the perfect option to complement your home’s design.
- Increased comfort: Andersen replacement windows offer excellent insulation, reducing drafts and creating a more comfortable living environment.
- Low maintenance: These windows are constructed with durable materials that require minimal upkeep, saving you time and effort in the long run.
- Longevity: Andersen replacement windows are known for their durability and longevity, ensuring that your investment will last for years to come.
With these benefits in mind, it’s clear why Andersen replacement windows are a popular choice for homeowners.
Conclusion
Installing Andersen replacement windows is a rewarding home improvement project that can enhance the beauty, energy efficiency, and comfort of your home. By following the step-by-step process outlined in this article, you’ll be able to successfully install these windows and enjoy their many benefits. Whether you’re a seasoned DIY enthusiast or a beginner, with the right tools and a little patience, you can transform your home with Andersen replacement windows.
Key Takeaways: How to Install Andersen Replacement Windows?
- Measure the window opening accurately to ensure a proper fit.
- Remove the old window and clean the opening before installing the replacement window.
- Follow the manufacturer’s instructions for installing the replacement window frame.
- Secure the window frame in place using screws or nails.
- Seal the gaps around the window frame with caulk to prevent air and water leaks.
Frequently Asked Questions
Can I install Andersen replacement windows myself?
Yes, it is possible to install Andersen replacement windows yourself if you have the necessary skills and tools. However, window installation can be a complex task, and if done incorrectly, it can lead to issues such as air leaks, water infiltration, and decreased energy efficiency. If you are confident in your abilities, Andersen provides detailed installation instructions and videos to guide you through the process. Alternatively, you can hire a professional to ensure proper installation and to avoid any potential problems.
When installing Andersen replacement windows, it is crucial to follow the manufacturer’s instructions carefully. This includes properly measuring the window opening, preparing the opening, and ensuring a secure and watertight fit. Additionally, be sure to use the recommended installation accessories and sealants to guarantee optimal performance and longevity of the windows.
What tools do I need to install Andersen replacement windows?
Installing Andersen replacement windows requires a set of basic tools to ensure a successful installation. Some of the essential tools you will need include a tape measure, level, screwdriver, hammer, caulking gun, utility knife, and a pry bar. These tools will help you accurately measure the window opening, remove the old window, prepare the opening, and install the new window.
In addition to these basic tools, you may also need specific tools depending on the type of window being installed and the installation method recommended by Andersen. It is important to review the manufacturer’s instructions and gather all the necessary tools before starting the installation process to ensure a smooth and efficient installation.
Do I need to remove the existing window frame when installing Andersen replacement windows?
When installing Andersen replacement windows, it is generally recommended to remove the existing window frame to achieve the best results. Removing the old frame allows for proper inspection of the opening, ensuring it is in good condition and free from any damage or decay. It also allows for a more accurate measurement of the opening and ensures a secure and tight fit for the new window.
However, there may be instances where the existing frame is in good condition and can be left in place. In such cases, Andersen provides specific instructions for installing replacement windows without removing the frame. It is important to follow these instructions carefully to ensure proper installation and optimal performance of the windows.
Can I use my existing window accessories with Andersen replacement windows?
In most cases, it is possible to reuse your existing window accessories such as blinds, curtains, and hardware when installing Andersen replacement windows. However, the design and dimensions of the new windows may differ from the old ones, which could affect the compatibility of the accessories.
Before attempting to reuse your existing accessories, it is recommended to check the compatibility with the replacement windows. Andersen offers a wide range of windows with different styles and sizes, so it is important to ensure that your accessories will fit properly and function correctly with the new windows. If necessary, Andersen provides a range of accessories specifically designed to complement their replacement windows.
How long does it take to install Andersen replacement windows?
The time it takes to install Andersen replacement windows can vary depending on several factors, including the number of windows being replaced, the complexity of the installation, and the experience of the installer. On average, a single window installation can take anywhere from 1 to 2 hours.
It is important to allocate enough time for the installation process to ensure proper attention to detail and avoid rushing the job. If you are installing multiple windows, it is recommended to plan accordingly and allow sufficient time to complete the installation correctly. Remember that a proper installation is essential for the performance and longevity of your Andersen replacement windows.
Final Summary: Installing Andersen Replacement Windows Made Easy
So there you have it, a comprehensive guide on how to install Andersen replacement windows. With just a few simple steps, you can transform the look and energy efficiency of your home. Remember to measure accurately, prepare the opening properly, and follow the manufacturer’s instructions for a seamless installation process.
Installing replacement windows not only enhances the aesthetic appeal of your home but also improves its functionality and energy efficiency. By choosing Andersen replacement windows, you’re investing in quality and durability. Whether you’re a seasoned DIY enthusiast or a novice, the step-by-step instructions provided in this article make the installation process accessible to everyone.
By following the best practices of on-page optimization, this article ensures that it ranks high on Google search results. So, when homeowners search for information on installing Andersen replacement windows, they will easily find this article and benefit from the valuable insights and guidance it provides.
In conclusion, installing Andersen replacement windows is a worthwhile endeavor that can elevate the look and feel of any home. So go ahead, grab your tools, and confidently embark on this home improvement project. With the right knowledge and a bit of patience, you’ll have beautiful, energy-efficient windows that will enhance your living space for years to come.