Renovation Notes
How Do I Achieve A Smooth Finish On Repaired Drywall?
So, you’ve finally tackled that patch of damaged drywall in your home, but now you’re left wondering, “How do I achieve a smooth finish on repaired drywall?” Don’t worry, my friend, I’ve got you covered! In this article, we’ll explore some expert tips and tricks to help you achieve a flawless finish that will make your repaired drywall blend seamlessly with the rest of your walls.
When it comes to repairing drywall, achieving a smooth finish is all about technique and attention to detail. Whether you’re dealing with a small hole or a larger patch, the process remains the same. First, you’ll want to prepare the damaged area by removing any loose debris and ensuring the surface is clean and smooth. Then, it’s time to apply a layer of joint compound, also known as mud, using a putty knife or trowel. This step is crucial as it creates a smooth base for the subsequent layers. Don’t be afraid to apply multiple thin coats, allowing each layer to dry before adding the next. Once the joint compound is dry, it’s time to sand the surface to achieve that coveted smooth finish. Remember to use a fine-grit sandpaper and work in circular motions to avoid creating uneven patches. Finally, wipe away any dust and prime the repaired area before painting to ensure a flawless, professional-looking result. With these tips in mind, you’ll be well on your way to achieving a smooth finish on your repaired drywall in no time
To achieve a smooth finish on repaired drywall, follow these steps:
- Start by sanding the repaired area using fine-grit sandpaper to even out any imperfections.
- Apply a thin layer of joint compound over the repaired area using a putty knife, feathering the edges for a seamless blend.
- Once the joint compound is dry, sand it again to smooth out any ridges or bumps.
- Apply a second coat of joint compound, repeating the feathering and sanding process.
- Finally, prime the repaired area before painting to ensure a consistent finish.
How Do I Achieve a Smooth Finish on Repaired Drywall?
Drywall repairs are a common task for homeowners, but achieving a smooth finish can be a challenge. Whether you’re patching a hole or fixing a dent, it’s important to follow the right techniques to ensure a seamless result. In this article, we will explore the steps and tips you need to know to achieve a smooth finish on repaired drywall.
Preparation is Key
Before you begin the repair process, it’s crucial to properly prepare the damaged area. Start by cleaning the surface of any dust, dirt, or loose debris. Use a vacuum or a damp cloth to remove any particles that could interfere with the repair. Next, assess the extent of the damage and determine if any additional steps, such as adding backing or replacing the drywall, are necessary. Once you have a clear understanding of the scope of the repair, you can proceed with confidence.
When it comes to repairing drywall, having the right materials and tools is essential. Gather all the necessary supplies, including drywall compound, sandpaper, a putty knife, and a taping knife. It’s also a good idea to have a drop cloth or plastic sheeting to protect the surrounding area from dust and debris. By gathering all your materials beforehand, you can work efficiently and avoid unnecessary interruptions.
Step-by-Step Repair Process
Now that you’re prepared, let’s dive into the step-by-step process of achieving a smooth finish on repaired drywall.
1. Patch the Damaged Area
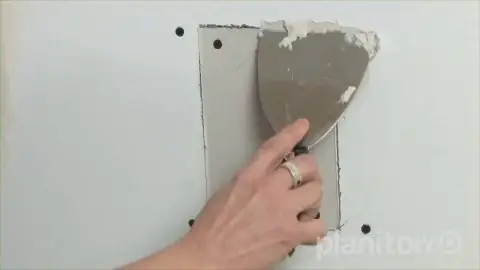
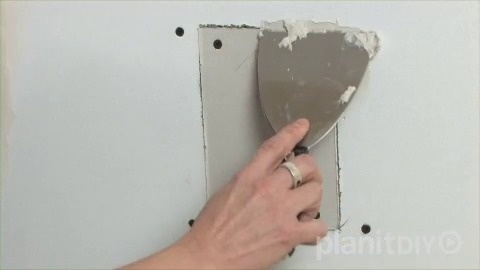
Begin by applying a thin layer of drywall compound over the damaged area, using a putty knife or taping knife. Make sure to spread the compound evenly, extending it slightly beyond the edges of the hole or dent. For larger repairs, you may need to apply multiple layers, allowing each layer to dry before proceeding to the next.
Once the compound is applied, press a piece of drywall tape firmly into the compound, ensuring it covers the entire patched area. Smooth out any air bubbles or wrinkles in the tape with your knife. Apply a second layer of compound over the tape, feathering the edges to create a seamless transition between the patch and the surrounding wall.
2. Sand and Feather the Edges
After the compound has dried, it’s time to sand the patched area. Using fine-grit sandpaper, gently sand the surface until it feels smooth to the touch. Be careful not to apply too much pressure, as this can damage the surrounding wall. As you sand, focus on feathering the edges of the patch, gradually blending it into the rest of the wall. This will help achieve a seamless finish once the paint is applied.
3. Apply Additional Layers of Compound
To ensure a truly smooth finish, you may need to apply additional layers of drywall compound. Each layer should be slightly wider than the previous one, allowing you to feather the edges and create a gradual transition. Remember to let each layer dry completely before sanding and applying the next. This process may require several rounds of compound and sanding until the repaired area is indistinguishable from the rest of the wall.
Tips for a Perfect Finish
Now that you know the basic steps, here are some additional tips to help you achieve a flawless finish on your repaired drywall.
1. Use Thin Layers of Compound
When applying compound, it’s better to use thin layers and build up gradually. This will make it easier to feather the edges and achieve a smooth result. Thick layers of compound can be difficult to blend, leading to visible seams or ridges.
2. Sand Between Layers
To achieve a truly seamless finish, sanding between layers is crucial. This helps remove any imperfections and creates a smooth surface for the next layer of compound. Take your time and be patient during the sanding process, ensuring each layer is perfectly smooth before proceeding.
3. Prime Before Painting
Before applying paint, it’s important to prime the repaired area. Primer helps seal the compound and provides a consistent surface for the paint to adhere to. Without primer, the repaired area may absorb paint differently, resulting in an uneven finish. Be sure to choose a primer that is specifically designed for drywall repairs.
4. Blend with Surrounding Texture
If your walls have a textured finish, it’s important to match the texture of the repaired area with the surrounding wall. Use a texture spray or a sponge to create a similar texture on the patched area. This will help the repaired section blend seamlessly into the rest of the wall.
Common Mistakes to Avoid
When repairing drywall, there are a few common mistakes that can affect the final result. By avoiding these pitfalls, you can achieve a smooth finish and be proud of your repair job.
1. Rushing the Drying Process
It’s crucial to allow each layer of drywall compound to dry completely before sanding or applying the next layer. Rushing this process can result in a compromised finish, as the wet compound may shrink or crack when drying. Follow the manufacturer’s instructions for drying times and be patient throughout the repair process.
2. Neglecting Feathering
Feathering the edges of the patch is essential for achieving a smooth finish. Neglecting to feather can leave visible lines or ridges, making the repaired area easily noticeable. Take your time and pay attention to this step to ensure a seamless blend.
3. Skipping Sanding
Sanding is a crucial step in achieving a smooth finish. It helps remove imperfections and creates a level surface for painting. Skipping this step can result in a rough and uneven appearance, even with multiple layers of compound.
Conclusion
Achieving a smooth finish on repaired drywall may seem daunting, but with the right techniques and attention to detail, it can be accomplished. By properly preparing the damaged area, following the step-by-step process, and avoiding common mistakes, you can achieve a seamless result that will leave your walls looking flawless. So, roll up your sleeves, gather your materials, and get ready to transform your damaged drywall into a smooth and beautiful surface.
Key Takeaways: How to Achieve a Smooth Finish on Repaired Drywall
- Use a sanding block or sandpaper to smooth out any rough patches on the repaired drywall.
- Apply a coat of primer before painting to ensure a smooth and even finish.
- Use a high-quality paint roller or brush to apply the paint in thin and even layers.
- Sand between coats of paint to remove any imperfections and create a smooth surface.
- Take your time and be patient during the process to achieve the best results.
Frequently Asked Questions
Question 1: What tools do I need to achieve a smooth finish on repaired drywall?
To achieve a smooth finish on repaired drywall, you will need a few essential tools. Firstly, you will need a putty knife or a taping knife to apply the joint compound. This tool will help you spread and smooth the compound over the repaired area. Additionally, a sanding block or sandpaper will be necessary to sand down the dried compound and create a smooth surface. Lastly, a dust mask and safety goggles are important for protecting yourself from any dust or debris that may be generated during the sanding process.
Remember to choose the appropriate size of putty knife or taping knife based on the size of the repaired area. A wider knife is suitable for larger repairs, while a narrower one works well for smaller patches. Additionally, ensure that you have sandpaper with different grits available, as finer grits are used for the final sanding to achieve a smooth finish.
Question 2: How should I prepare the repaired drywall before applying joint compound?
Before applying joint compound to the repaired drywall, it is essential to properly prepare the surface to ensure a smooth finish. Start by inspecting the repaired area for any loose or protruding drywall paper or compound. Use a utility knife to carefully trim away any excess material and smooth the edges of the repair.
Next, clean the repaired area with a damp cloth to remove any dust or debris. This will ensure that the joint compound adheres well to the surface. If there are any noticeable gaps or holes, fill them with a patching compound and allow it to dry completely. Once the area is clean and dry, you can proceed with applying the joint compound.
Question 3: How do I apply joint compound to achieve a smooth finish on repaired drywall?
To apply joint compound for a smooth finish on repaired drywall, start by loading the compound onto your putty knife or taping knife. Hold the knife at a slight angle and apply a thin layer of compound over the repaired area, extending it slightly beyond the edges. Use long, smooth strokes to spread the compound evenly.
After the first layer is applied, allow it to dry completely. This may take several hours or overnight, depending on the type of joint compound used. Once dry, lightly sand the dried compound with a sanding block or sandpaper to smooth out any imperfections. Repeat the process of applying thin layers of compound and sanding in between until you achieve a seamless and smooth finish.
Question 4: How can I ensure a professional-looking finish on repaired drywall?
To achieve a professional-looking finish on repaired drywall, attention to detail is key. Take your time when applying the joint compound and ensure that each layer is smooth and even. Use a sanding block or sandpaper to carefully sand down any uneven areas between each layer.
Feather the edges of the compound to blend it seamlessly with the surrounding wall. This involves tapering the edges of the compound by applying less pressure as you move away from the center of the repair. Feathering helps to create a smooth transition between the repaired area and the rest of the wall, resulting in a professional finish.
Question 5: Are there any additional tips for achieving a smooth finish on repaired drywall?
Yes, here are a few additional tips to help you achieve a smooth finish on repaired drywall. Firstly, make sure to prime the repaired area before painting to ensure proper adhesion and a consistent finish. Use a high-quality primer specifically designed for drywall repairs.
When sanding the joint compound, be mindful of the pressure you apply. Too much pressure can result in uneven sanding and potentially damage the repaired area. Take your time and use a gentle, even pressure to achieve the desired smoothness.
How to get SMOOTH MUDWORK!
Final Thoughts: Achieving a Smooth Finish on Repaired Drywall
So, you’ve tackled the task of repairing drywall, but now you’re wondering how to achieve that smooth, flawless finish that will make your repair work blend seamlessly with the rest of your wall. Well, fear not! With a few simple techniques and a little bit of patience, you can achieve professional-looking results that will leave your walls looking as good as new.
First and foremost, preparation is key. Before you even think about applying any joint compound or sanding, make sure to properly clean and prime the repaired area. This will ensure that the compound adheres well and creates a strong bond with the wall. Once you’ve done that, it’s time to apply the joint compound. Start by applying a thin layer of compound over the repaired area, feathering the edges to create a smooth transition. Allow it to dry completely, and then repeat the process, gradually building up the layers until the repair is flush with the surrounding wall. Remember, patience is key here – rushing the drying process can lead to uneven results.
Once the joint compound is dry, it’s time to sand. Grab a sanding block or sandpaper and gently sand the repaired area, keeping the pressure even and using light, circular motions. This will help smooth out any imperfections and create a seamless finish. After sanding, be sure to wipe away any dust with a damp cloth or sponge to ensure a clean