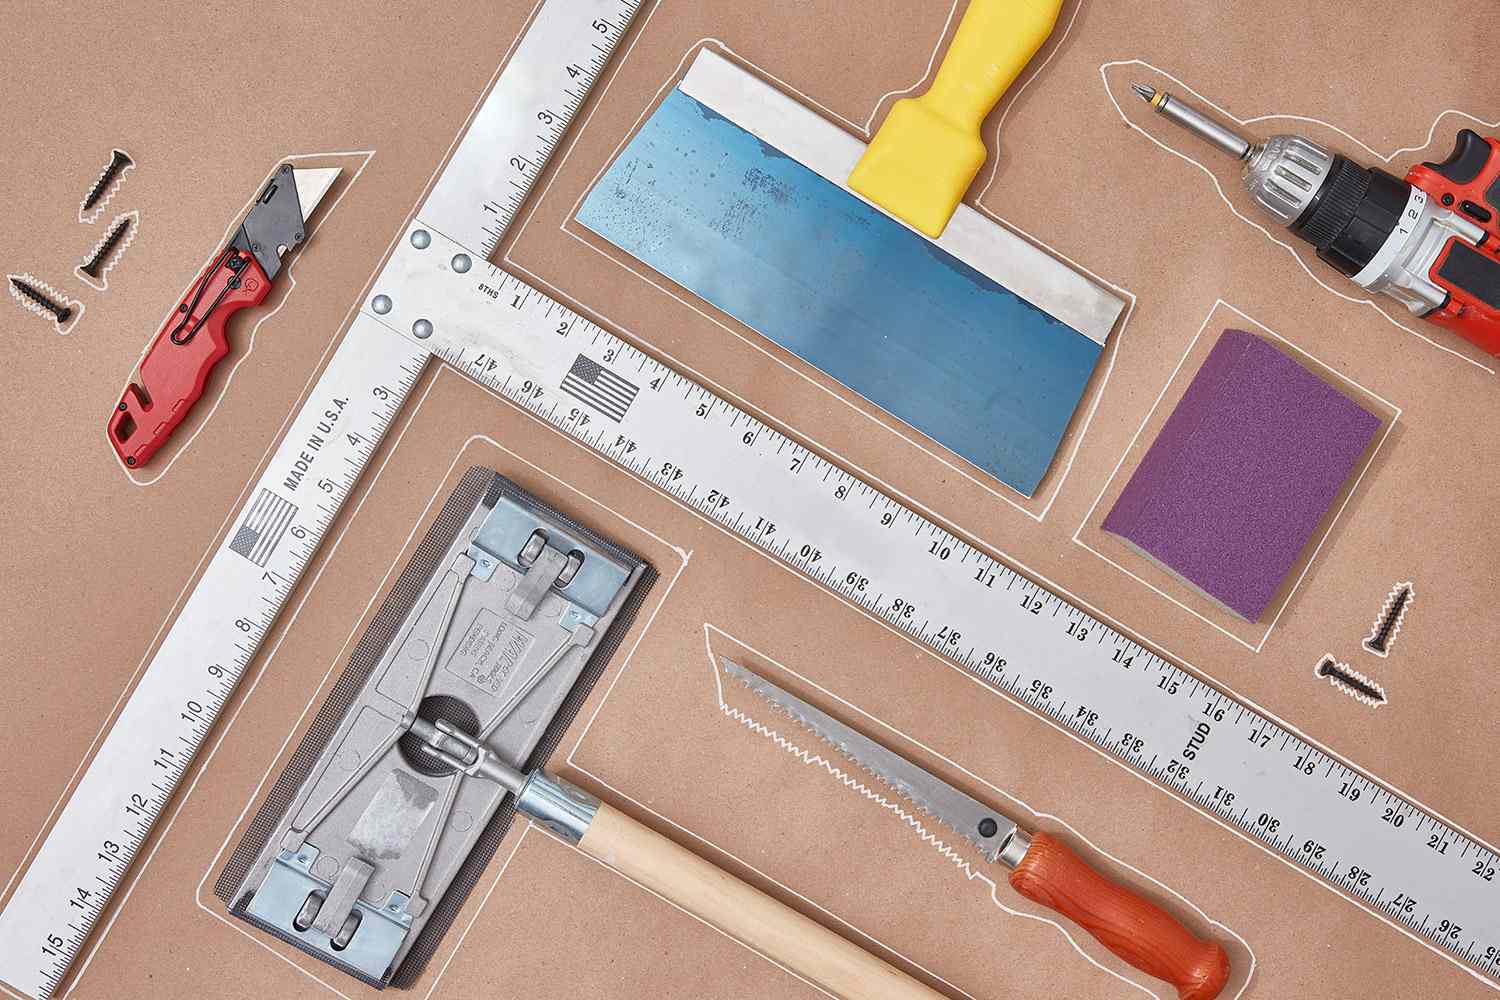
If you’ve found yourself staring at a hole in your drywall, you might be wondering, “What tools do I need for drywall repair?” Well, worry not, my friend, because I’ve got you covered! In this article, we’ll dive into the essential tools you’ll need to fix those pesky cracks, dents, and punctures in your drywall. So, grab your toolbox and let’s get started!
When it comes to drywall repair, having the right tools can make all the difference. From patching small nail holes to repairing larger damaged areas, you’ll need a few key items to get the job done. First up, you’ll want to have a utility knife on hand. This versatile tool will help you cut through the damaged area and remove any loose or damaged sections of drywall. Next, you’ll need a putty knife or a taping knife. These tools are perfect for applying joint compound or spackle to fill in the holes and create a smooth surface. And don’t forget about sandpaper! It’s essential for smoothing out the repaired areas and ensuring a seamless finish. So, now that you know the basics, let’s dig deeper into the world of drywall repair tools and equip you with everything you need to tackle those repairs like a pro!
What Tools Do I Need for Drywall Repair?
Drywall repair is a common task that homeowners often face. Whether it’s a small hole or a larger area that needs patching, having the right tools for the job is essential. In this article, we will discuss the necessary tools you need for drywall repair and how they can help you achieve professional-looking results.
1. Utility Knife
A utility knife is a versatile tool that should be in every DIYer’s toolbox. When it comes to drywall repair, a utility knife is essential for cutting and trimming the damaged area. It allows you to make precise cuts and remove any loose or damaged sections of drywall. Additionally, a utility knife can be used to score the surface of the drywall, making it easier to break along the scored line.
When using a utility knife for drywall repair, it’s important to use a sharp blade to ensure clean cuts. Dull blades can tear the drywall, resulting in a sloppy repair. It’s also a good idea to have spare blades on hand, as they can wear out quickly, especially when dealing with larger repairs.
Benefits of Using a Utility Knife:
Using a utility knife for drywall repair offers several benefits. First, it allows for precise cuts, ensuring a clean and professional-looking repair. Second, the small size of a utility knife makes it easy to maneuver in tight spaces. Finally, utility knives are affordable and readily available at most hardware stores, making it a cost-effective tool for DIYers.
Tips for Using a Utility Knife:
When using a utility knife for drywall repair, there are a few tips to keep in mind. First, always cut away from your body to avoid accidents. Second, make multiple shallow cuts instead of trying to cut through the drywall in one pass. This will prevent the blade from getting stuck and potentially damaging the surrounding area. Lastly, be sure to replace the blade when it becomes dull to maintain clean cuts.
2. Drywall Saw
A drywall saw, also known as a keyhole saw, is another essential tool for drywall repair. Unlike a utility knife, a drywall saw is designed to cut through thicker materials, such as drywall and wood. It features a long, narrow blade with small teeth that can easily penetrate the surface of the drywall.
A drywall saw is particularly useful for larger repairs or when replacing an entire section of drywall. It allows you to make precise cuts and easily remove damaged sections. Additionally, a drywall saw can be used to create openings for outlets, switches, or other fixtures in the drywall.
Benefits of Using a Drywall Saw:
Using a drywall saw offers several benefits when it comes to drywall repair. First, its longer blade allows for deeper cuts, making it ideal for tackling larger repairs. Second, the small teeth on the blade provide better control and prevent the saw from getting stuck. Lastly, drywall saws are relatively inexpensive and can be found at most hardware stores.
Tips for Using a Drywall Saw:
When using a drywall saw, it’s important to use slow and controlled strokes. This will prevent the saw from jumping or slipping, which can lead to uneven cuts or injuries. Additionally, be sure to wear safety goggles and gloves to protect yourself from any debris or sharp edges. Finally, always measure and mark the area before cutting to ensure accuracy.
3. Joint Compound
Joint compound, also known as drywall mud, is a crucial component of any drywall repair project. It is a thick paste that is used to fill in gaps, seams, and holes in the drywall. Joint compound is available in different formulations, such as ready-mixed or powder form, and it can be easily applied with a putty knife or trowel.
When using joint compound for drywall repair, it’s important to choose the right consistency. Thicker compounds are ideal for filling larger holes and gaps, while thinner compounds are better for feathering out seams and creating a smooth finish. It’s also important to allow the joint compound to dry completely before sanding and painting.
Benefits of Using Joint Compound:
Using joint compound for drywall repair offers several benefits. First, it provides a smooth and seamless finish, making the repaired area blend in with the surrounding drywall. Second, joint compound is easy to work with and can be easily shaped and sanded to achieve the desired result. Finally, it is readily available at most home improvement stores and is relatively affordable.
Tips for Using Joint Compound:
When using joint compound, it’s important to apply it in thin layers, allowing each layer to dry before applying the next. This will prevent the compound from cracking or shrinking as it dries. Additionally, use a putty knife or trowel to smooth out the compound and feather the edges for a seamless finish. Lastly, be sure to sand the dried compound before painting to achieve a smooth surface.
4. Sanding Block
After applying joint compound and allowing it to dry, sanding is an essential step in achieving a smooth and finished look. A sanding block, also known as a sanding sponge, is a convenient tool for sanding drywall. It features a foam or rubber block with an abrasive surface that can be used to smooth out the joint compound and remove any imperfections.
When using a sanding block for drywall repair, it’s important to use light pressure and sand in a circular motion. This will prevent over-sanding and ensure an even finish. It’s also a good idea to use a sanding block with different grits, starting with a coarser grit and progressing to a finer grit for a smooth and polished surface.
Benefits of Using a Sanding Block:
Using a sanding block for drywall repair offers several benefits. First, it provides better control and precision compared to using sandpaper alone. Second, the abrasive surface of the sanding block ensures even sanding and helps achieve a smooth finish. Lastly, sanding blocks are reusable and can be easily cleaned for future use.
Tips for Using a Sanding Block:
When using a sanding block, it’s important to wear a dust mask and safety goggles to protect yourself from any airborne particles. Additionally, be sure to work in a well-ventilated area to minimize dust accumulation. Remember to clean the sanding block periodically to remove any debris that may interfere with the sanding process.
5. Putty Knife
A putty knife is a versatile tool that is essential for any drywall repair project. It is used for applying joint compound, scraping away loose or damaged material, and smoothing surfaces. Putty knives come in various sizes, with wider blades being suitable for larger repairs and narrower blades for detailed work.
When using a putty knife for drywall repair, it’s important to choose the right size for the task at hand. A wider blade allows for better coverage and faster application of joint compound, while a narrower blade provides more control and precision. Additionally, be sure to clean the putty knife after each use to prevent dried compound from interfering with future repairs.
Benefits of Using a Putty Knife:
Using a putty knife for drywall repair offers several benefits. First, it allows for easy application of joint compound, ensuring a smooth and consistent finish. Second, a putty knife can be used to scrape away loose or damaged material, preparing the surface for repair. Lastly, putty knives are affordable and readily available at most hardware stores.
Tips for Using a Putty Knife:
When using a putty knife, it’s important to hold it at a slight angle to the surface for better control and smoother application. Apply even pressure when spreading the joint compound to avoid uneven patches. When scraping away loose material, be gentle to avoid damaging the surrounding area. Finally, clean the putty knife with warm water and soap after each use to remove any dried compound.
Additional Tools
In addition to the tools mentioned above, there are a few more tools that can come in handy during drywall repair:
1. Taping Knife:
A taping knife is a wider version of a putty knife and is specifically designed for applying joint tape to seams. It helps create a smooth and seamless finish.
2. Drywall T-Square:
A drywall T-square is a measuring and cutting tool that ensures straight and accurate cuts when working with drywall sheets.
3. Sandpaper:
Sandpaper is used for finer sanding after using a sanding block. It comes in various grits and should be selected based on the level of smoothness desired.
4. Drywall Screws and Screwdriver:
Drywall screws are used to secure the drywall to the studs or framework. A screwdriver or drill with a screwdriver bit is necessary for driving the screws into place.
5. Drywall Tape:
Drywall tape is used to reinforce seams and prevent cracks or gaps from appearing in the repaired area. It is applied over the joint compound before sanding and painting.
6. Dust Mask and Safety Goggles:
Wearing a dust mask and safety goggles is crucial when working with drywall to protect yourself from airborne particles and debris.
Conclusion
In conclusion, having the right tools for drywall repair is essential for achieving professional-looking results. A utility knife, drywall saw, joint compound, sanding block, and putty knife are some of the essential tools you need. Additionally, tools like a taping knife, drywall T-square, sandpaper, drywall screws and screwdriver, drywall tape, and safety gear can also be beneficial. With these tools in hand, you’ll be well-equipped to tackle any drywall repair project with confidence.
Key Takeaways: What Tools Do I Need for Drywall Repair?
- Putty knife: A must-have tool for scraping away loose or damaged drywall.
- Sanding block: Use it to smooth out rough patches and create a seamless finish.
- Joint compound: Essential for filling in cracks and holes in the drywall.
- Drywall tape: Use it to reinforce seams and prevent future cracks.
- Screwdriver: Needed for removing and replacing screws in the drywall.
Frequently Asked Questions
What are the essential tools for drywall repair?
When it comes to drywall repair, having the right tools is crucial for achieving professional results. Here are the essential tools you’ll need:
1. Utility knife: This versatile tool is used for cutting and scoring drywall sheets to the desired size. It’s also handy for trimming excess paper and making precise cuts.
2. Drywall saw: A drywall saw is designed specifically for cutting through drywall. It has a sharp, pointed tip that allows for easy starting and a serrated blade for efficient cutting.
3. Joint compound: Also known as mud, joint compound is used to fill in gaps, smooth out seams, and cover nail or screw holes. It’s available in different formulas, such as lightweight or all-purpose, depending on your specific needs.
4. Sandpaper: To achieve a smooth finish, sandpaper is essential. Start with a coarse grit (around 120) to remove any imperfections, then switch to a finer grit (around 220) for a polished result.
5. Putty knife: A putty knife is used for applying joint compound and smoothing it out. It’s available in different sizes, so choose one that suits the size of the repair area.
What other tools might be helpful for drywall repair?
In addition to the essential tools mentioned earlier, there are a few other tools that can make your drywall repair job easier:
1. Drywall square: A drywall square is a measuring and marking tool that helps ensure accurate cuts and angles. It’s particularly useful for complex repairs or when working with multiple pieces of drywall.
2. Drywall rasp: A drywall rasp is used to smooth rough edges and shape cutouts in drywall. It’s especially useful for creating precise openings for electrical outlets or switches.
3. Drywall lift: If you’re working on large or ceiling repairs, a drywall lift can be a game-changer. It allows you to easily hold and position drywall sheets in place while you secure them.
4. T-square: A T-square is another handy tool for measuring and marking straight lines on drywall. It helps ensure accurate cuts and alignment.
Remember, while these additional tools can be beneficial, they may not be necessary for every drywall repair project. Assess the scope of your repair and choose the tools accordingly.
How do I patch a small hole in drywall?
Patching a small hole in drywall is a relatively simple process. Here’s a step-by-step guide:
1. Clean the area: Start by removing any loose debris or drywall particles around the hole. Use a utility knife or sandpaper to smooth the edges.
2. Apply joint compound: Using a putty knife, apply a thin layer of joint compound over the hole. Make sure to spread it evenly and feather out the edges to blend with the surrounding wall.
3. Apply patch: Place a self-adhesive drywall patch over the hole, pressing it firmly into the joint compound. Smooth out any air bubbles or wrinkles.
4. Apply additional layers: Allow the first layer of joint compound to dry completely, then apply a second and third layer, each wider than the previous one. Feather out the edges to create a seamless finish.
5. Sand and prime: Once the final layer of joint compound is dry, use sandpaper to smooth the patched area. Wipe away any dust and apply a coat of primer before painting to ensure a uniform finish.
What should I do if the drywall repair area is larger?
If you’re dealing with a larger drywall repair area, the process is slightly different. Here’s what you should do:
1. Cut out the damaged section: Use a utility knife or drywall saw to carefully cut out the damaged portion of the drywall. Make sure to create clean, straight lines.
2. Install a patch: Cut a replacement piece of drywall to fit the hole and secure it to the studs using drywall screws. Be sure to leave a small gap between the patch and the surrounding drywall for joint compound.
3. Apply joint compound: Use a putty knife to apply joint compound over the seams and screw holes. Apply multiple thin layers, feathering out the edges to create a seamless transition.
4. Sand, prime, and paint: Once the joint compound is dry, sand the patched area until smooth. Wipe away any dust and apply a coat of primer before painting to blend the repair with the rest of the wall.
Are there any safety precautions to keep in mind during drywall repair?
While drywall repair is generally a safe task, it’s important to take some precautions to protect yourself:
1. Wear safety goggles: When cutting or sanding drywall, wear safety goggles to protect your eyes from dust and debris.
2. Use a dust mask: Drywall dust can be irritating to the respiratory system. Wear a dust mask to prevent inhalation of dust particles.
3. Protect your hands: When handling tools or working with joint compound, wear gloves to protect your hands from cuts and irritation.
4. Use proper ventilation: Ensure the area is well-ventilated to prevent the build-up of dust and fumes. Open windows or use fans to improve air circulation.
By following these safety precautions, you can minimize potential risks and create a safe working environment for your drywall repair project.
The BEST Tools for DIY Drywall!
Final Thoughts: The Essential Tools for Drywall Repair
When it comes to tackling drywall repair, having the right tools is crucial. With the proper equipment at your disposal, you can confidently take on any cracks, holes, or dents that may have appeared on your walls. So, what tools do you need to get the job done? Let’s recap the essentials.
First and foremost, a reliable utility knife is a must-have for any drywall repair project. This versatile tool allows you to easily cut through the drywall, creating clean and precise edges. Additionally, a putty knife is invaluable for spreading joint compound and smoothing it out for a seamless finish. Don’t forget to have sandpaper on hand to help you achieve a smooth surface once the repairs are complete.
Another essential tool is a drywall saw, which enables you to make precise cuts in the drywall when necessary. Additionally, a drill with a screwdriver bit will come in handy for securing the drywall patches or making adjustments. Finally, a good quality taping knife is essential for applying joint tape and feathering the edges of the compound for a flawless result.
Remember, having the right tools not only makes the process smoother and more efficient but also ensures a professional-looking outcome. So, gather your tools, follow the necessary steps, and soon you’ll have your walls looking as good as new!
